DXKeeper allows you to display and modify more than 100 items of information about each QSO. Some, like the station's callsign or the QSO's start time, will always be of interest. Others, like the station's grid square, may never be utilized. DXKeeper organizes these items into 9 groups:
Each of these groups is associated with a panel on the Log QSOs tabbed dialog. The QSO panel is always present; you can independently control the presence of the Auxiliary, QSL, Online QSL, Award, Contest, Propagation, Details, and User-defined panels using the Log Panel checkboxes in the Configuration window's Log tab or using the eight checkboxes to the right of the QSO panel. All information items are stored with each QSO, whether or not the panels displaying them are visible. This allows you to adjust DXKeeper's consumption of screen real estate to meet your operating needs of the moment.
Dates displayed in the above panels follow the short date format specified in the Windows Control Panel's Regional and Language Options applet's Regional Options tab.
Double-clicking the caption of an unselected item will select that item:
the item immediately receives keyboard focus (which means that keys you strike will be directed to the selected item)
the item's caption is rendered in underlined font
selecting another QSO in the Log Page Display will set the keyboard focus in the selected item of that QSO
Double-clicking the underlined caption of a selected item will de-select that item, setting keyboard focus in the Filter panel textbox.
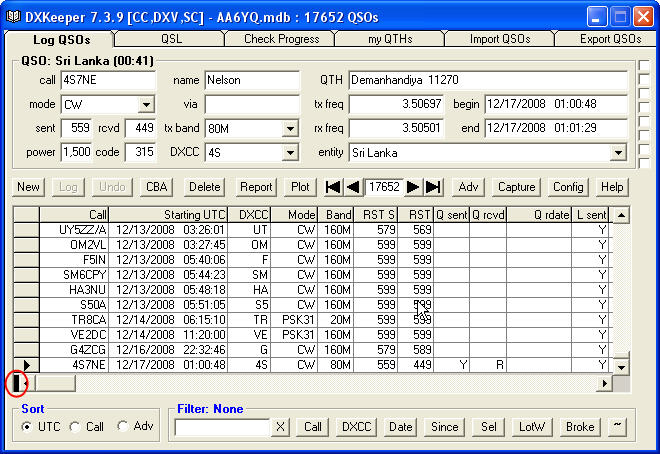
Located at the bottom of the Main window's Log QSOs tab, the Log Page Display contains one entry for each QSO in the current Log file, subject to settings in the Filter panel. Each entry in the Log Paged Display corresponds to one QSO in your log. If you select a QSO by clicking it's entry in the Log Page Display, the panels above will display the information items stored for that QSO. If the QSO's duration is non-zero, the QSO panel displays the duration in mm:ss notation; the QSO panel also displays the full name of the station's DXCC entity, as well as the DXCC prefix and country code assigned to this entity by the ARRL. Some of these items are also shown in the Log Page Display; the caption at the top of each column identifies the information item in the cells below it.
If you select a QSO that contains one or more items that contain an invalid value, or select a QSO that is missing a required item, clicking the Log or New buttons or attempting to select another QSO will flash the labels of any such items in red font, and the QSO will remain selected; if the Provide audible feedback box is checked, the "Windows Default Beep" will play each time the labels flash. Frequencies not falling within a defined band are considered invalid. Callsign validity checking can be enabled or disabled via the Flag Invalid Callsigns setting. If an item's data exceeds its specified maximum length, its label will be flashing in red and the Log button will not enter the QSO into the current log. Until you correct the error(s) causing the item labels to flash or until you delete the QSO, the New, and Log buttons will not function, and you will be unable to select another QSO. Disabling the Flag Invalid Callsigns option will immediately stop an invalid callsign from being considered invalid.
When first installed, DXKeeper's Log Page Display is configured to show 8 of items stored with each QSO. You can add or remove items from the Log Page Display using the Log page fields control in the Log Layout panel on the Configuration window's Log tab. You can also change the order in which the columns appear.
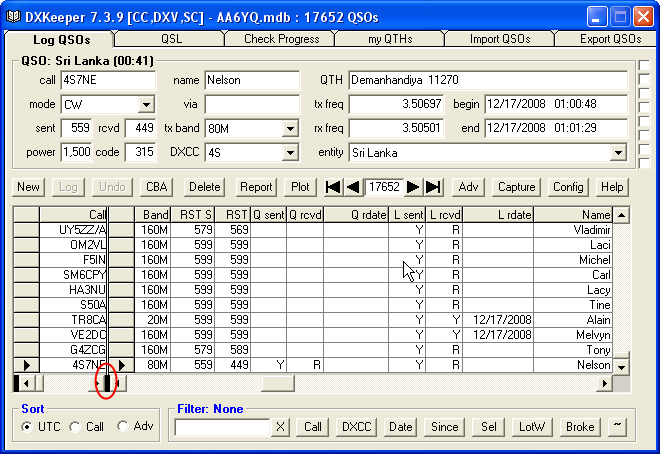
Whether all items in the Log Page Display will be simultaneously visible as columns depends on their number and width, the width of the Main window, and the font selected for use. If all items are not simultaneously visible in columns, a horizontal scrollbar will be displayed along the bottom of the Log Page Display; you can use this scrollbar to select the items you wish to see. The small black rectangle to the left of the horizontal scrollbar can be dragged to the right to split the Log Page Display into two independently scrollable sets of columns. You can adjust the boundary between the two sets by dragging the black rectangle to the left of the horizontal scrollbar at the bottom of the right-hand set of columns; to eliminate the right-hand set of columns, drag its black rectangle all the way to the left.
To change the height of each row in the Log Page Display, position the cursor over a horizontal line in the left-most column; when properly positioned, the cursor will change to the Windows border adjustment cursor, allowing you to click and drag the row border to either expand or contract the row height as desired. Clicking the Reset button in the Log Page Display panel on the Configuration window's Log tab will set the Log Page Display's row height and column width to match the Log Page Display's selected font.
Dates displayed in the Log Page Display follow the short date format specified in the Windows Control Panel's Regional and Language Options section. The format selected must specify a 4-digit year.
A Log Page Display entry will be rendered in red font if its Callsign, Band, and Mode match those in the Capture window; this can help avoid making duplicate QSOs.
With the Log QSOs tabbed dialog selected, resizing DXKeeper's window allows you to vertically and horizontally expand or contract the Log Page Display. Vertical and horizontal scrollbars allow you to view all cells of all rows in the log page display.
The left-most column of the Log Page Display is shaded, and has no column caption. Click in this selector column selects the associated QSO:
all information items for this QSO are placed in the log textboxes
if DXView is running, it's earth map and information fields are updated to reflect the selected QSO's call item and grid 1 item
if Pathfinder is running, it's callsign textbox will be populated with the call item; if an automatic search has been configured, it will be actived.
if an item has been selected, it will receive keyboard focus
The four VCR-like control buttons on the Log QSOs tab allow you to select the first, previous, next, or last QSO in the Log Page Display. You can similarly navigate the Log Page Display using the CTRL-Home, PageUp, PageDown, and CTRL-End keys respectively. The number displayed between these control buttons indicates the position of the currently-selected QSO in the Log Page Display as it is presently sorted. Note that the Auxiliary panel's QSO# item does not represent the QSO's order -- beyond the fact that a QSO with a smaller QSO# was logged before a QSO with a larger QSO#.
Right-clicking a Log Page Display entry provides menu containing commands for frequently-used functions:
Set Select to Y: sets the QSO's Select item to Y
QSY: if Commander is running, changes your transceiver's frequency and mode to that of the selected QSO
Spot: if SpotCollector is running, generates an outgoing spot of the selected QSO's callsign, frequency, rx frequency (if spot split frequency is enabled), mode, and SOTA tag; if the Spot POTA, SOTA, & WWFF tags option is enabled and user-defined items with Captions set to POTA or WWFF are specified, the tags they contain will also be included in the spot notes
Spot: with Notes: if SpotCollector is running, prompts you to specify spot notes, and then generates an outgoing spot of the selected QSO's callsign, frequency, rx frequency (if spot split frequency is enabled),and the notes you specified
if you specify spot notes, it is up to you to include the mode in those spot notes
if you do not specify spot notes and the mode is neither CW nor SSB, the outgoing spot notes will specify the mode
Display Progress: displays the Callsign Progress window, whose grid shows the bands and modes on which previous QSOs have been logged with the selected QSO's callsign
Add Entry to QSL Queue: immediately adds the entry's QSO to the QSL Queue
Print QSL Card: immediately prints a QSL card for the entry's QSO
Print Address on Envelope: immediately prints the entry's address on an Envelope
Print self-addressed Envelope: immediately prints a self-addressed Envelope
Upload to LotW: SL(SC): immediately uploads entry's QSO to the ARRL's Logbook of the World using the Station Location SL. If SL does not specify a Station Callsign, the QSO's Station Callsign item will be used, and will be shown in the menu command as (SC).
Upload to eQSL.cc: immediately uploads the entry's QSO to eQSL.cc
Upload to Club Log: immediately uploads the entry's QSO to Club Log
Delete from Club Log: immediately deletes the entry's QSO from Club Log
Display File: if the entry's QSO specifies a file item, display the contents of the specified file using the default file viewer for the file's extension
Display eQSL: if the entry's QSO is confirmed via eQSL and if an eQSL.cc username and password have been specified; displays the previously-downloaded QSL image for this QSO (if present) or displays a QSL image downloaded from eQSL.
Play Audio: if the entry's QSO specifies an audio file item, directs Windows to play the contents of that audio file
Copy to Windows Clipboard: copy the entry's callsign, frequency (or frequencies), mode, date, time, DXCC prefix, and DXCC country to the Windows clipboard
Double-clicking an entry in the Log Page Display
with Contest Mode enabled, filters the Log Page Display to show only QSOs with that entry's callsign made during the current year and whose Contest ID items match the current Contest ID
while depressing the Ctrl button, filters the Log Page Display to show only QSOs with that entry's DXCC entity.
If the Highlight duplicate QSOs box is checked, then entries in the Log Page Display whose callsign, band, and mode match those of the Capture window will be highlighted in red font.
If the Indicate LotW & eQSL AG status box is checked, then the background colors of entries in the Log Page Display will indicate whether the entry's callsign is a known participant of LotW and/or an Authenticity-Guaranteed member of eQSL.cc, as specified in the Capture Callsign and Log Page Display background colors panel on the Capture and Log Page Display Colors window.
The Callsign Progress window's grid shows the bands and modes on which previous QSOs have been logged with a selected callsign:
the callsign of the Log Page Display entry selected by right-clicking and executing the Display Progress function
the callsign in the Capture window when its Lookup function is executed with the Display callsign progress on Lookup box checked
the callsign in the Main window's Log QSO tab when, after entering or modifying a callsign in the call item, you strike the Enter key or the Tab key with the Display callsign progress on Lookup box checked
The Callsign Progress window's title bar shows the callsign for which information is displayed. Cells in the Callsign Progress window's grid show the status of band-mode combinations using these codes:
W worked
R a QSL card has been sent requesting a confirmation
C confirmed via QSL card or LotW (or via eQSL.cc if the Include eQSL.cc confirmations... box is checked)
V verified (award credit granted) by the ARRL
Information shown in the Callsign Progress window's grid is automatically updated when a new QSO is logged with the selected callsign, or when existing QSOs with the selected callsign are modified.
Cells
in the Callsign Progress window's grid are live
-- you can navigate from them to your log by double-clicking:
double-clicking
a column heading in the Callsign Progress grid
filters the
Log Page display to show all QSOs with the callsign on
the band associated with the selected column shows the
Log Page display double-clicking
a row heading in the Callsign Progress grid
filters the
Log Page display to show all QSOs with the callsign in the
mode associated with the selected row shows the
Log Page display double-clicking
a cell in the Callsign Progress grid
filters the
Log Page display to show all QSOs with the callsign on
the band associated with the selected column and in the mode
associated with the selected row shows the
Log Page display
You can modify items in the currently selected QSO by directly modifying the item textboxes. After a QSO is recorded by clicking the Log or New buttons on the Main window's Log QSOs tab or by clicking the Log button on the Capture window, the Require Edit to modify logged QSOs setting determines whether the Edit button must be clicked before making changes to that QSO. If Require Edit to modify logged QSOs is enabled, then attempted changes will be ignored until the Edit button is clicked, after which changes are permitted, and the Edit button is replaced by a Save button that can be clicked to record the changes. If Require Edit to modify logged QSOs is not enabled, changes to items in the current QSO can be made at any time; such changes can be recorded by clicking the Save button. Changes are also recorded by taking any action that causes another QSO become selected.
If your modification to one or more critical items in a QSO makes those items invalid, clicking the Log or New buttons or attempting to select another QSO will flash the labels of any such items in red font, and the QSO will remain selected; if the Provide audible feedback box is checked, the "Windows Default Beep" will play each time the labels flash. Frequencies not falling within a defined band are considered invalid. Callsign validity checking can be enabled or disabled via the Flag Invalid Callsigns setting. If an item's data exceeds its specified maximum length, its label will be flashing in red font and the Log button will not enter the QSO into the current log. Until you correct the error(s) causing the item labels to flash or until you delete the QSO, the New, and Log buttons will not function, and you will be unable to select another QSO. Disabling the Flag Invalid Callsigns option will immediately stop an invalid callsign from being considered invalid.
Within an item textbox
the Home key moves the cursor to the beginning of the item
the End key moves the cursor to the end of the item
the SHIFT-Home key selects all characters from the cursor to the beginning of the item
the SHIFT-End key selects all characters from the cursor to the end of the item
Changing the tx freq item in a simplex QSO and striking the Enter or Tab key or subsequently moving cursor focus to the rx freq item will update the rx freq item to match the tx freq.
You can make your changes permanent by clicking the Save button, or back out your changes using the Undo button.
If the optimize for realtime QSO entry setting is checked,
setting the QSL Sent, item to 'Y' will set the Date Sent item to the current UTC date
setting the QSL Rcvd, item to 'Y' will set the Date Rcvd item to the current UTC date
setting the eQSL.cc Rcvd item to 'Y' will set the eQSL.cc Date Rcvd item to the current UTC date
setting the LotW QSL Rcvd item to 'Y' will set the LotW Date Rcvd item to the current UTC date
The OQRS button in the QSL panel updates a QSO to indicate that you have requested its confirmation via an electronic QSLing service like OQRS:
QSL Sent is set to 'Y'
Date Sent is set to the current UTC date
QSL Sent Via is set to 'E'
QSL Rcvd is set to 'R'
The CFM button in the QSL panel makes it easy to process an incoming QSL card for the currently selected QSO. Clicking this button
sets QSL received to "Y" (yes)
sets QSL date received to the current UTC date
if a card was not previous sent, sets QSL sent to "R" (requested)
If an item has a default value, Ctrl-double-clicking the caption of that item will display the Configuration window and place the mouse cursor in the default value.
DXKeeper also provides the ability to modify multiple QSOs en masse.
You can delete the currently selected QSO by clicking the Delete button. If either the Confirm QSO deletion or Require Edit to modify logged QSOs settings are enabled, you will be prompted to confirm the action. You can delete all QSOs in the Log Page Display by depressing the CTRL key while clicking the Delete button; this action always requires confirmation. There is no undo operation for a confirmed delete operation.
if Audio Recording is enabled with the Automatically delete QSO Audio file option also enabled, deleting a QSO that specifies an audio file will automatically delete that audio file.