Dates displayed in the Log Page Display follow the short date format specified in the Windows Control Panel's Regional and Language Options section. The format selected must specify a 4-digit year.
When first installed, DXKeeper's Log Page Display is configured to show 8 of the more than 100 items associated with each QSO. You can add or remove items from the Log Page Display using the table in the Log Page Display panel on the Configuration window's Log tab. This table also lets you modify the Log Page Display's column captions, change column widths, and change the column order.
To add a column to the Log Page Display that displays a specified item,
scroll to the last row of the table in the Log Page Display panel; this row is distinguished by an asterisk in its leftmost cell
in the Item cell of this last row, click the pulldown icon (a small black triangle) and choose the item to be displayed from the resulting list (the pulldown contains ADIF field names - to correlate with the field captions, consult the cross reference)
in the Caption cell of the newly added row, enter the text to appear at the top of the item's column in the Log Page Display, followed by the enter key
in the Align cell of the newly added row, select the desired alignment (left or right)
click in any cell of any other row
Note that to see the newly added field, you may need to horizontally scroll the log page display or increase the width of DXKeeper's Main window.
Checking the Include Entity name with DXCC prefix box will expand the Log Page Display's DXCC Prefix column to include both the DXCC prefix and full DXCC entity name for each QSO.
To remove a column from the Log Page Display,
in the table in the Log Page Display panel, select the row corresponding to the column to be removed by clicking in row's leftmost cell (this cell is shaded)
strike the Delete key on your keyboard
To change the text that appears at the top of an item's column in the Log Page Display,
in the table in the Log Page Display panel, select the row corresponding to the Log Page Display column
modify the row's Caption cell
click in any cell of any other row
To change the alignment of any item in the Log Page Display,
in the table in the Log Page Display panel, select the row corresponding to the Log Page Display column
modify the row's Align cell
click in any cell of any other row
To change the width of a column in the Log Page Display, position the cursor over the vertical line to the left or right of the column's caption; when properly positioned, the cursor will change to the Windows border adjustment cursor, allowing you to click and drag the column border to either expand or contract the column width as desired. Clicking the Log Page Display panel's Reset button will set the Log Page Displays' row height and column width to match the Log Page Display's font size.
To change the order of columns in the Log Page Display, click on the caption of a column you wish to relocate. Then click-and-drag the column until the two red positioning triangles indicate the desired new location.
To change the height of a row in the Log Page Display, position the cursor over a horizontal line in the left-most column; when properly positioned, the cursor will change to the Windows border adjustment cursor, allowing you to click and drag the row border to either expand or contract the row height as desired. Clicking the Log Page Display panel's Reset button will set the Log Page Displays' row height and column width to match the Log Page Display's font size.
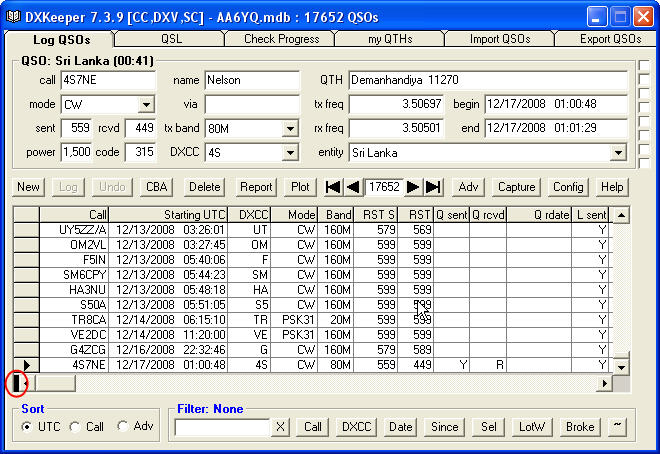
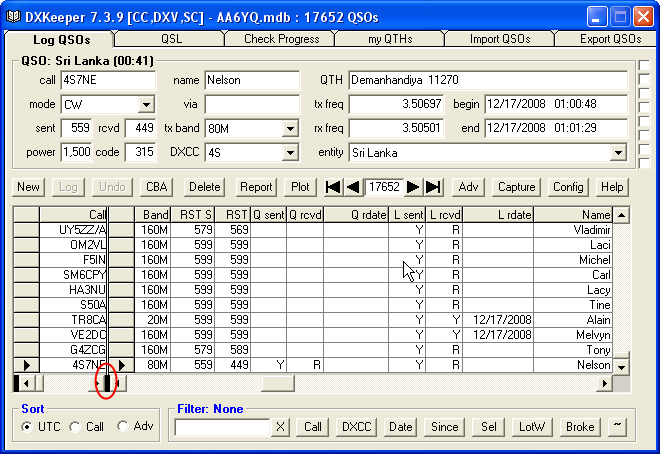
To split the Log Page Display into two independently scrollable sets of columns, use the black rectangle to the left of the horizontal scroll bar. Using the left mouse button to click-and-drag this rectangle to the right will create a second set of columns. To eliminate this second set of columns, click-and-drag this rectangle back to the left margin.
You can save the Log Page Display's current layout to a file, and you can restore a layout stored a previously saved file. The Automatically update layout file box, when checked, causes the specified Log Page Display layout file to automatically be updated to reflect changes made to the Log Page Display's layout without your approval of each such update.
If the Highlight duplicate QSOs box is checked (Configuration window, General tab, Options panel), then entries in the Log Page Display whose callsign, band, and mode match those of the Capture window will be highlighted in red font.
In the Log Page Display panel at the bottom of the Configuration window's Log tab,
If the Indicate LotW & eQSL AG status box is checked,
If SpotCollector has been installed and run, the settings in the Background Colors panel on SpotCollector's Configuration window's Spot Database Display tab specify the Log Page Display background colors that indicate whether an entry's callsign is a known participant in LotW and/or an Authenticity-Guaranteed member of eQSL.cc,
If SpotCollector has not been installed and run, clicking the Colors button displays the DXKeeper Capture and Log Page Display Colors window, which enables you to specify the Log Page Display background colors.
The Fonts button enables you to specify the font and font metrics (size, bold, italic) used in the Log Page Display.|
The Reset button sets the Log Page Displays' row height and column width to match the Log Page Display's font size.
The Frequency precision box specifies the number of decimal digits shown in transmit frequencies and receive frequencies appearing in the Log Page Display; the valid range is 3 to 6.
The Power precision box specifies the number of decimal digits shown in the transmit power appearing in the Log Page Display; the valid range is 0 to 6.
The Chronological Sort Order panel determines whether the Sort panel's UTC button, the Sync eQSL.cc QSLs operation, and the Sync LotW QSLs operation will sort the Log Page Display in ascending or descending order of QSO Begin time, eQSL Date Rcvd, or LotW Date Rcvd respectively. If the Sort panel's UTC sort is active, a change to the sort order is immediately effected