 |
Configuring DXKeeper is primarily accomplished via the Configuration window and the QSL Configuration window.
DXKeeper's QSL Configuration window presents 12 tabs:
the General tab enables you to preset each new QSO's 'QSL Requested" checkbox, indicate whether multiple QSOs should be confirmed on each QSL card or label, and customize the operation of the Add Needed and Add Requested functions
the Cards tab enables you to specify the dimensions of QSL cards and Reply cards, and the information to be printed on each card
the QSL Labels tab enables you to specify the dimensions of QSL labels
the Envelopes tab enables you to specify the layout of your envelopes, your return address, and whether or not an Airmail designator is to be printed
the Address Labels tab enables you to specify the dimensions of address labels
the QSL Msgs tab enables you to specify up to 8 standard QSL messages
the eQSL tab enables you to specify your eQSL.cc username and password, and control synchronization between DXKeeper and eQSL.cc
the LoTW tab enables you to specify your LoTW username and password, specify uploading parameters, and control synchronization between DXKeeper and LoTW
the ClubLog tab enables you to specify your Club Log email address, username, and password, enable automatic uploading, and govern the way DXKeeper processes Inbound OQRS requests
the QRZ tab enables you to specify the Station Callsign and API Key for each of your QRZ Logbooks, select the QRZ Logbook to receive uploaded QSOs and report confirmations, and enable automatic uploading
the ADIF & TDF tab enables you to control the precision of frequencies exported to ADIF and Tab-delimited files from the QSL Queue and suppress QSL Via items whose content is not a single callsign
the Printer tab enables you to select the printer(s) on which QSL cards, QSL labels, envelopes, and address labels will be printed
The Options panel provides the ability to set default values for the Capture window's QSL requested and use bureau checkboxes, and to enable the confirmation of multiple QSLs on each QSL card or label:
| Preset 'QSL Requested' checkbox |
When checked, the Capture window's QSL requested checkbox will be set for each new QSO |
| Preset 'use bureau' checkbox | When checked, the Capture window's use bureau checkbox will be set for each new QSO |
| Initialize QSL Sent to 'R' for each imported QSO | When checked, each imported QSO's QSL Sent item will be set to 'R' unless the imported value is 'Y' |
| Outgoing QSLs request confirmation unless already confirmed | When checked, each outgoing QSL card or label will requests a confirmation by displaying 'please!' or 'pse!' respectively unless the QSO has already been confirmed; changing this setting has no affect on QSOs already present in the QSL Queue |
| Confirm multiple QSOs per QSL |
|
| Prompt on change to logged QSO already uploaded to Club Log, eQSL.cc, LoTW, or QRZ | When checked, modification of a QSO's item that impacts a QSLing service (Club Log, eQSL.cc, LoTW, or QRZ) to which it has already been uploaded will display a reminder to re-upload the QSO after changes have been completed and saved |
| Upload QSOs whose callsigns begin with ! | when checked, QSOs with callsigns whose first character is ! can be added to the QSL Queue and uploaded to Club Log, eQSL, LOTW, or QRZ; the ! will be removed from such callsigns that appear in QSL media media printed from the QSL Queue, in files exported from the QSL Queue, or in QSOs uploaded to Club Log, eQSL, LOTW, or QRZ |
The Add Needed panel controls the operation of the Add Needed function:
| Add Needed requests all with same call | when checked, the Add Needed function will, on adding to the QSL Queue a QSO whose confirmation is needed, also add to the QSL Queue all QSOs with that station that haven't been confirmed by QSL card |
| Add Needed requests all with same mgr | when checked, the Add Needed function will, on adding to the QSL Queue a QSO whose confirmation is needed, also add to the QSL Queue all QSOs with that QSO's QSL manager that haven't been confirmed by QSL card |
| Add Needed sets Sent Via to 'B' (for Bureau) | when checked, the Add Needed function sets each needed QSO's Sent Via item to B (for Bureau) before adding it to the QSL Queue |
| Add Needed sets Sent Via to 'D' (for Direct mail) | when checked, the Add Needed function sets each needed QSO's Sent Via item to D (for Direct mail) before adding it to the QSL Queue |
| Add Needed sets Sent Via to 'E' (for Electronic File Transfer) | when checked, the Add Needed function sets each needed QSO's Sent Via item to E (for Electronic File Transfer) before adding it to the QSL Queue |
| Add Needed sets Sent Via to 'R' (for Reply Card) | when checked, the Add Needed function sets each needed QSO's Sent Via item to R (for Reply Card) before adding it to the QSL Queue |
| Awards | the Add Needed function will populate the QSL Queue with confirmation requests needed for each award whose box in this panel is checked |
The Add Requested panel controls the operation of the Add Requested function:
| Add Requested never request confirmation | when checked, QSL cards or labels generated from QSOs added to the QSL Queue by the Add Requested function will not include 'please!' or 'pse!' in their QSL column |
| Add Requested no dup band-modes | when checked, the Add Requested function won't generate a QSL Queue entry unless doing so would give the receiving station a new confirmed band or mode, or unless the QSL Via panel is set to LoTW or eQSL.cc |
| Add Requested sets Sent Via to 'B' (for Bureau) | when checked, the Add Requested function sets each needed QSO's Sent Via item to B (for Bureau) before adding it to the QSL Queue |
| Add Requested sets Sent Via to 'D' (for Direct mail) | when checked, the Add Requested function sets each needed QSO's Sent Via item to D (for Direct mail) before adding it to the QSL Queue |
| Add Requested sets Sent Via to 'E' (for Electronic File Transfer) | when checked, the Add Requested function sets each needed QSO's Sent Via item to E (for Electronic File Transfer) before adding it to the QSL Queue |
The Sync All panel determines which online confirmation services are processed by the Sync All function in this sequence:
eQSL - when checked, the Sync All function invokes the Sync eQSL QSLs function
LoTW - when checked, the Sync All function invokes the Sync LoTW QSOs function followed by the Sync LoTW QSLs function
upload to Club Log & QRZ - when checked, the Sync All function invokes the
if this panels' Club Log and QRZ boxes are both unchecked, the upload to Club Log & QRZ box is disabled, and the Sync All function does not invoke the Upload to Club Log or Upload to QRZ functions
if this panels' Club Log box is checked, the Sync All function invokes the Upload to Club Log function
if this panels' QRZ box is checked, the Sync All function invokes the Upload to QRZ function
if this panels' Club Log and QRZ boxes is checked, the Sync All function invoke both the Upload to Club Log and the Upload to QRZ functions
Club Log - when checked, the Sync All function invokes the Sync Club Log QSLs function
QRZ - when
checked, the Sync All function invokes the
Sync QRZ QSLs function
The
QSL Date Format panel
selects the date format used on QSL cards, Reply
cards, QSL labels, and in tab-delimited files
exported from the QSL Queue or exported
from the Log Page Display.
The Address report panel
provides a Report one address per
callsign option that when enabled limits the generated
Address File to report a callsign's
address once, no matter how many entries are present for that callsign in the
QSL Queue; if this option is disabled, an address is reported for each entry in
the QSL Queue.
The Page Layout panel lets you specify whether DXKeeper prints
one QSL card or Reply card per page, aligned on the printer's right-side paper guide
one QSL card or Reply card per page, centered in the printer's paper guide
one QSL card or Reply card per page, aligned on the printer's left-side paper guide
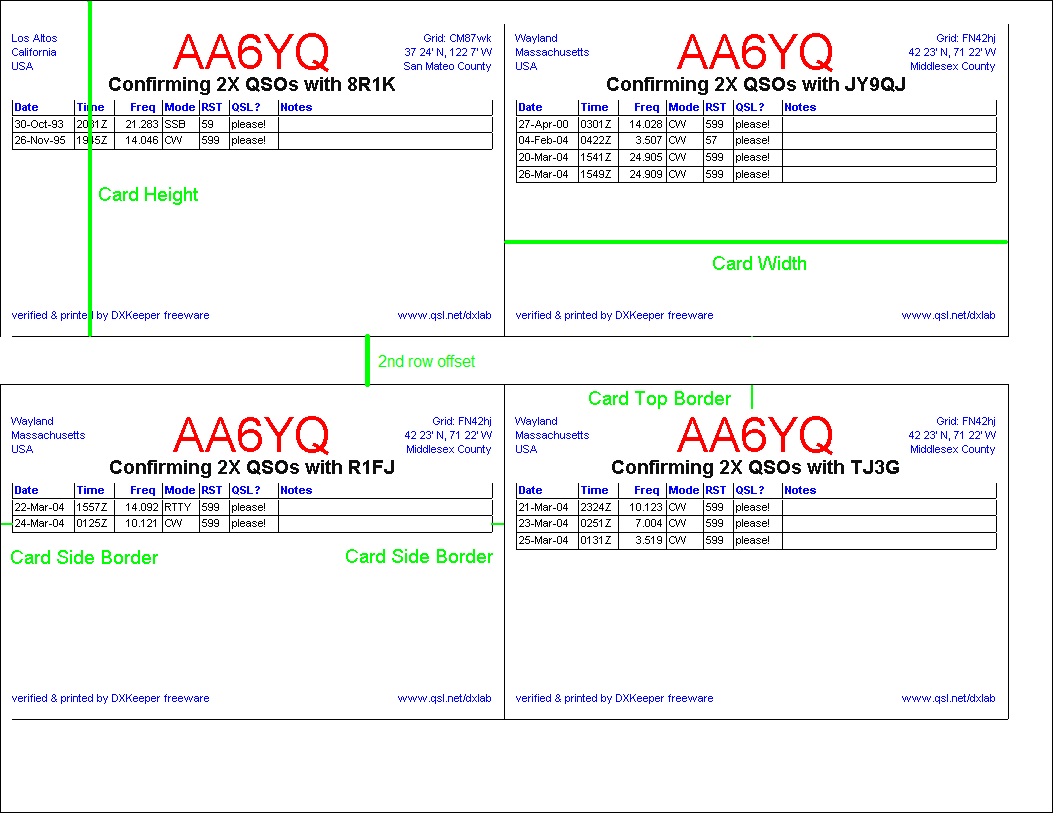
four QSL cards or Reply cards per page, as shown in this layout:
|
If you choose 4 cards per page, guides that make it easier to separate the cards will be printed if you check the Page Layout panel's print separation guides box.
This tab's Frequency panel allows you to specify whether generated QSL cards and Reply cards show a QSO's frequency or its band.
This tab's Card Dimensions panel allows you to specify the geometry of each card, and the separation between the two rows of cards printed four cards per page:
| Width | the width of each QSL card in inches or millimeters as specified by the Inches and Millimeters selectors |
| Height |
the height of each QSL card in inches or millimeters as specified by the Inches and Millimeters selectors |
| Side border | the width of the left and right side border of each card in inches or millimeters as specified by the Inches and Millimeters selectors |
| Top border | the width of the top border of each card in inches or millimeters as specified by the Inches and Millimeters selectors |
| 2nd row offset | the separation between the top row of cards and the bottom row of cards printed four cards per page |
Additional panels on this tab provide control of information printed on QSL cards generated by DXKeeper. You can individually specify the font name, metrics (size, bold, italic), and color of the station callsign, confirmation statement, QSO information, and the text positioned in each corner of the card. Double-clicking a font name, size, or color control displays a dialog box that facilitates selection of the desired parameters.
You can also specify the pathname of a file containing a background image in BMP format to be printed on QSL cards.You can use Microsoft Paint to open a file in JPG format and save it in BMP format. If the Background Image panel's Enable box is checked, then DXKeeper will compute an image size in pixels from the printable area dimensions reported by the selected printer's driver, the specified card Width and Height, and your monitor resolution; the computed image size is displayed at the top of the Print Preview window. If the selected printer's driver reports left and top margins of 0, then background image will cover the entire QSL card; otherwise, there will be side margins equal to the printer's left margin, and top/bottom margins matching the printer's top margin. The selected background image will be adjusted to fit; an image whose pixel size exactly matches the computed image size shown at the top of the Print Preview window will not be adjusted -- otherwise, re-sampling and/or changes to the image's aspect ratio may be required.
If you are printing QSL cards on blank cardstock either without a background image or with a background image that does not include the station callsign, check the Station Callsign panel's Display box so that DXKeeper will print each QSO's station callsign. If the Below Upper Text box is unchecked, the station callsign with be printed at the top-center of each card; if this box is checked, the station callsign will be printed in the center of each QSL card below the fourth line of Upper Text -- allowing more or larger text in the Upper Left and Upper Right text boxes, but reducing the number of QSOs that can be confirmed on a single QSL card. Note that the callsign printed is taken from the QSO's station call item, not the from the default station callsign; this allows you to operate with multiple callsigns within the same log -- e.g. AA6YQ and AA6YQ/1 -- and print the correct callsign on each card.
If you are printing QSL cards or Reply cards on cardstock preprinted with your callsign or using a background image that includes the station callsign, then uncheck the Station Callsign panel's Display box.
If you want the contents of the QSO's Via item to be appended to the Confirmation information if those contents are a valid callsign, check the Confirmation panel's Include QSL Manager box. If you want [x buro] (where x is the DXCC prefix for the destination QSL bureau) appended to the Confirmation information if the QSL is to be sent via the QSL bureau, check the Confirmation panel's Include [buro] box.
Below the Confirmation information, DXKeeper will print a table consisting of a row of Heading text followed by one row of Information text for each QSO being confirmed. The QSO Information panel lets you specify the color of the font used to display text in the Heading row, and separately specify the color of the font used to display text in the QSO Information rows. If you'd like the table's rows and columns to be separated by lines, check the QSO Information panel's print grid lines box, and specify the color to be used to render these lines.
Information from the following QSL Information textboxes is printed on every QSL card using the specified font parameters and color:
| Upper Left Text |
up to 4 lines of text positioned in the card's upper left corner |
| Upper Right Text |
up to 4 lines of text positioned in the card's upper right corner |
| Lower Left Text |
up to 1 lines of text positioned in the card's lower left corner |
| Lower Right Text |
up to 1 lines of text positioned in the card's lower right corner |
Typically, these QSL Information text boxes are used to print information about your QTH -- your city, county, state, grid-square, etc. If you are printing QSL cards on cardstock preprinted with your QTH information, then simply leave the QSL Information text boxes blank. If you always operate from the same place, then you can directly enter your QTH information. But if you operate from multiple locations and want your QSL cards to accurately indicate the QTH from which you made the QSO, then you must
specify each QTH, assigning each a unique identifier
make sure that each QSO's myQTH field contains the identifier for the QTH from which that QSO was made
use appropriate QSL substitution commands in the QSL information fields
By using QSL substitution commands in the QSL Information textboxes, you can establish one QSL card style that will correctly print QSL cards for QSOs made from a variety of locations. Each substitution command found in a QSL Information textbox is replaced by the appropriate information for the QTH from which the current QSO was made.
Information is printed in the four corners of a Reply card using 8-point Arial font:
upper-left corner: Reply Card
upper-right corner: recipient's DXCC entity
lower-left corner: Date Printed
lower-right corner: signature line
The font colors used to display the above information are specified by the Upper Left Text Font color, Upper Right Text Font color, Lower Left Text Font color, and Lower Right Text Font color settings, respectively.
Font metrics for a Reply card's Station Callsign and
Confirmation line are specified by the Station Callsign and Confirmation
panel settings, respectively. The Station Callsign panel's Below Upper
Text setting is ignored when generating Reply Cards, as are the Confirmation
panel's Include QSL Manager and Include [buro] settings.
Each QSL label is composed of a Confirmation line and a table consisting of a Heading row and one row of QSO Information for each confirmed QSO. You can individually control the font name, font metrics (size, bold, italic), and font color of each of these elements with the Confirmation Font, Heading Font, and QSO Information Font boxes at the bottom of the tab. Double-clicking a font name, font size, or font color control displays a dialog box that facilitates selection of the desired parameters. If you'd like the table's rows and columns to be separated by lines, check the print grid lines box.
This tab's Frequency panel allows you to specify whether generated QSL labels show a QSO's frequency or its band.
The following settings are used in the Single Address Labels, 2-column Address Labels, and 3-column Address Labels panels to specify the geometry of the QSL labels you're using.. Sample settings are available here.
| Label model # | manufacturer's model number for the label in use (serves as a reminder to the user) |
| Labels per column |
the number of labels in each column |
| Row 1 offset |
distance from the top edge of the label sheet to the top of the first row of label, in inches or millimeters as specified by the Units panel |
| Row height |
distance from the top edge of the one row of labels to the top edge of the next row of label, in inches or millimeters as specified by the Units panel |
| Column 1 offset |
distance from the left edge of the label sheet to the left edge of the first label column, in inches or millimeters as specified by the Units panel |
| Column 2 offset |
distance from the left edge of the label sheet to the left edge of the second label column, in inches or millimeters as specified by the Units panel; if 0, only 1 column of labels per page are printed |
| Column 3 offset |
distance from the left edge of the label sheet to the left edge of the third label column, in inches or millimeters as specified by the Units panel; if 0, only 2 columns of labels per page are printed |
| Label height | the height of each label, in inches or millimeters as specified by the Units panel (Single QSL labels only) |
| Label width |
the width of each label, in inches or millimeters as specified by the Units panel |
| Include QSL Mgr in confirmation | When checked, the contents of the QSO's Via item will be appended to the Confirmation line if the contents are a valid callsign (single labels and 2-column labels only) |
| Include [buro] in confirmation | When checked, [x buro] (where x is the DXCC prefix for the destination QSL bureau) will be appended to the Confirmation line if the QSL is to be sent via the QSL bureau (single labels and 2-column labels only) |
| Include QSL Mgr & Pse/Tnx QSL |
When checked, places the following information along
the bottom margin of each 3-wide label using the font metrics specified
in the Bottom Line Font panel:
|
| Include [buro] | When checked, [x buro] (where x is the DXCC prefix for the destination QSL bureau) will be printed along the bottom of 3-wide label using the font metrics specified in the Bottom Line Font panel if the QSL is to be sent via the QSL bureau and Include QSL Mgr & Pse/Tnx QSL is enabled (3-column labels only) |
You can print envelopes for conveying QSL cards to your QSO partner ("DX Envelopes") bearing addresses extracted from logged QSOs, and envelopes bearing your address ("Self-addressed Envelopes").
The following settings are used to specify the geometry of DX envelopes to be addressed, the location of the address on the envelope, and the return address to be printed.
| return address |
your return address (up to 5 lines) |
| top margin |
distance from the printer's top of page to the top edge of the envelope, in inches or millimeters as specified by the Units panel |
| left margin |
distance from the printer's left edge to the left edge of the envelope, in inches or millimeters as specified by the Units panel |
| address top offset |
distance from the top edge of the envelope to the first address line, in inches or millimeters as specified by the Units panel |
| address left offset |
distance from the left edge of the envelope to the left edge of the address, in inches or millimeters as specified by the Units panel |
| airmail Indicator |
check to have "Airmail, Par Avion" printed on each envelope |
| return Address font | specifies the font name, metrics (size, bold, italic), and color used to print the return address |
| DX Address font | specifies the font name, metrics (size, bold, italic), and color used to print the DX address |
| Append callsign to first line of address | check to append the callsign to the first line of the address |
| Print DX address in upper case | check to force the DX address to be printed in upper case |
If you always operate from the same place, then you can directly enter your return address; even if you operate from multiple locations, you may want all QSLs returned to the same address. But if you operate from multiple locations and want QSL cards returned to the location from which you operated, you must
By using the following substitution commands in the return address field, you can establish one return address specification that will correctly print envelopes whose return addresses are specified by the operating location. Each substitution command found in a return address field is replaced by the appropriate information for the QTH from which the current QSO was made, as shown in the following table:
| Command |
Replacement |
| <streetaddress> |
the QTH's street address |
| <city> |
the QTH's city |
| <county> |
the QTH's county |
| <state> |
the QTH's state |
| <postalcode> |
the QTH's postal code |
| <country> |
the QTH's country |
Self-addressed envelopes bear the return address specified in the DX Envelope panel. The DX Envelope panel's top margin and left margin settings and the following additional settings specify the geometry of Self-Addressed Envelopes:
| address top offset |
distance from the top edge of the envelope to the first address line, in inches or millimeters as specified by the Units panel |
| address left offset | distance from the left edge of the envelope to the left edge of the address, in inches or millimeters as specified by the Units panel |
| address font | specifies the font name, metrics (size, bold, italic), and color used to print the address |
| airmail indicator | check to have "Airmail, Par Avion" printed on each envelope |
The Printer Orientation panel determines whether DX Envelopes and Self-address Envelopes are printed in "portrait" or "landscape" orientation.
The following settings are used in the Single Address Labels, 2-column Address Labels, and 3-column Address Labels panels to specify the geometry of the address labels you're using.
| Label model # | manufacturer's model number for the label in use (serves as a reminder to the user) |
| Labels per column |
the number of labels in each column |
| Row 1 offset |
distance from the top edge of the label sheet to the top of the first row of label, in inches or millimeters as specified by the Units panel |
| Row height |
distance from the top edge of the one row of labels to the top edge of the next row of label, in inches or millimeters as specified by the Units panel |
| Column 1 offset |
distance from the left edge of the label sheet to the left edge of the first label column, in inches or millimeters as specified by the Units panel |
| Column 2 offset |
distance from the left edge of the label sheet to the left edge of the second label column, in inches or millimeters as specified by the Units panel; if 0, only 1 column of labels per page are printed |
| Column 3 offset |
distance from the left edge of the label sheet to the left edge of the third label column, in inches or millimeters as specified by the Units panel; if 0, only 2 columns of labels per page are printed |
| Label height | the height of each label, in inches or millimeters as specified by the Units panel (Single address labels only) |
| Label width |
the width of each label, in inches or millimeters as specified by the Units panel |
The Units panel determines whether dimensions in the Single Address Labels, 2-column Address Labels, and 3-column Address Labels panels are specified in inches or millimeters.
The Append callsign to first line of address option, when enabled, appends the callsign to the first line of the address
The Print DX address in upper case option forces the DX address to be printed in upper case.
The Return Address panel specifies up to 5 lines of address to be printed on self-addressed Single Address Labels, 2-column Address Labels, and 3-column Address Labels. If you always operate from the same place, then you can directly enter your return address; even if you operate from multiple locations, you may want all QSLs returned to the same address. But if you operate from multiple locations and want QSL cards returned to the location from which you operated, you must
By using the following substitution commands in the return address field, you can establish one return address specification that will correctly print envelopes whose return addresses are specified by the operating location. Each substitution command found in a return address field is replaced by the appropriate information for the QTH from which the current QSO was made, as shown in the following table:
| Command |
Replacement |
| <streetaddress> |
the QTH's street address |
| <city> |
the QTH's city |
| <county> |
the QTH's county |
| <state> |
the QTH's state |
| <postalcode> |
the QTH's postal code |
| <country> |
the QTH's country |
This tab provides 8 candidate QSL messages, any one of which can be selected as the default QSL message via the Defaults tab's QSL msg selector. You can also chose from among these messages using the Capture window's QSL msg selector. Double-clicking one of these messages invokes an editor window that's helpful when modifying a long QSL message. A QSL message's label will be highlighted in red if the maximum length is exceeded.
You can use substitution commands in QSL messages to include information determined by your current location.
when you open a log file, these settings are restored from that log file
Note: The Username and Password specified in this tab will appear in generated errorlog.txt files when Log debugging information is enabled; do not employ a username or password that you also use to secure valuable online accounts!
| Username * |
your eQSL.cc username |
| Password |
your eQSL.cc password, concealed by * characters; clicking the ? button reveals the password Note: eQSL.cc passwords can be no longer than 14 characters |
| Update button | when clicked, displays the eQSL Account window, which enables you to specify or modify the username or password to be used when accessing your eQSL account |
| QTH Nickname * |
optional eQSL.cc
QTH nickname
note: if Use each QSO's myQTHID as its QTH Nickname when uploading or exporting is enabled, this textbox will contain (myQTHID) and be disabled |
| Maximum time difference for considering a downloaded QSL to match a logged QSO (minutes) | if a downloaded QSL is consistent with a QSO's callsign, band, and mode, this parameter specifies the maximum difference in minutes between the QSL's begin time and the QSO's begin time for the QSL to be deemed a match for the QSO |
| Upload each QSO logged via the Capture window to eQSL.cc |
when checked, clicking the Capture window's Log button automatically uploads the QSO to eQSL.cc |
| Initialize eQSL Sent to 'R' for each logged or imported QSO |
when checked, |
| Use each QSO's myQTHID as its QTH Nickname when uploading or exporting | when checked, each QSO's myQTHID will be used as its QTH Nickname when uploading to eQSL.cc or when exporting for eQSL.cc, ignoring the contents of QTH Nickname textbox ; when not checked, the specified QTH Nickname will be used. |
| Don't upload QSOs whose station callsign isn't the specified Username | when checked, only QSOs whose station callsign matches the eQSL.cc Username will be uploaded to eQSL.cc by the Upload to eQSL.cc function |
| Prompt the user to specify a file containing the already-downloaded contents of an eQSL.cc Inbox when a Sync eQSL.cc QSLs operation is performed | when checked, the Sync eQSL.cc QSLs operation prompts you to specify a file containing the contents of an eQSL.cc Inbox that you have already downloaded |
| Retain eQSL images |
when checked, clicking the eQSL.cc Display
button checks to see if the current QSO's eQSL image has already been
downloaded into DXKeeper's eQSL
image folder
|
| eQSL image folder pathname | the pathname of the folder into which downloaded eQSL images are stored; click the Select button to choose a folder |
Update eQSL AG Membership button
enabled if the eQSL AG database is present in DXView's Databases folder or in DXKeeper's Databases folder
click to set the eQSL Member item to 'A' in all QSOs in the Log Page Display whose callsign is an Authenticity Guaranteed member of eQSL.cc
when you open a new log file, these settings are restored from that new log file
Note: The Username and Password specified in this tab will appear in generated errorlog.txt files when Log debugging information is enabled; do not employ a username or password that you also use to secure valuable online accounts!
| Username * |
your LoTW web account username |
| Password |
your LoTW web account password, concealed by * characters; clicking the ? button reveals the password |
| Update button | when clicked, displays the LoTW Account window, which enables you to specify or modify the username or password to be used when accessing your LoTW Web account |
| Upload each QSO logged via the Capture window to LoTW |
when checked, clicking the Capture window's Log
button automatically uploads the QSO to
LoTW
|
| Initialize LoTW Sent to 'R' for each logged QSO or Imported QSO | when checked, |
| Consider LoTW confirmations in outgoing card/label QSL? "please/thanks" decisions | when checked, a QSO confirmed via LoTW will be considered confirmed when deciding whether or not to print 'please!' or 'thanks!' in a QSL card's QSL? column or to print 'pse!' or 'tnx!' in a QSL label's QSL? column |
| Permit uploading of QSOs already uploaded to LoTW |
|
| PC has no internet connection (prompt operator to manually query LoTW) |
when checked, DXKeeper will prompt you to manually
upload a signed .TQ8 file, and to manually query LoTW and place
the query results in a designated file; this option should only be
selected when your PC does
not have a direct connection to the internet. This option can also be
used to report DXCC
verification discrepancies from a PC with no internet connection.
The URL you are directed to use is placed in the Windows Clipboard; use CTRL-V to paste it into your Web Browser's Address Bar. |
| Maximum age of most recent LoTW upload to be considered "active" (months) |
A QSO's LoTW Member will be set to Y if its callsign is considered to be an active LoTW participant for the reasons described above, or if its callsign appears in the LoTW database and has uploaded QSOs to LoTW after the QSO began. |
| Limit Sync operations to this station callsign * |
When this setting specifies a callsign, and QSL Via is set to LoTW, the Sync LoTW QSOs and Sync LoTW QSLs operations download and synchronize only QSOs and QSLs whose station callsign matches the specified callsign. When this setting is empty, the Sync LoTW QSOs and Sync LoTW QSLs operations download and synchronize all QSOs and QSLs independent of their station callsign. |
| Report unmatched QSOs or QSLs as errors * |
when checked,
|
| Exclude station callsign when matching downloaded QSOs & QSLs to logged QSOs * |
when checked,
|
The Handling of LoTW QSL detail inconsistencies setting controls the resolution of inconsistencies between a downloaded LoTW QSL and its matching logged QSO in the country code, CQ, ITU, Gridsquare, Iota, State, and/or County fields:
always replace the logged data with the LoTW QSL data
always preserve the logged data, ignoring the LoTW QSL data
always preserve the logged data, ignoring the LoTW QSL data, and describe each inconsistency in the report displayed when the Sync LoTW QSLs or Update from LoTW operation completes
display a dialog presenting the logged data and the LoTW QSL data so that the operator can choose
if the Ignore subsquare mismatches option is enabled, then the logged Grid will be replaced with the LoTW Grid if the first four characters of the logged and LoTW Grids are identical, no matter which of the above options is selected
TQSL settings:
| TQSL.exe pathname |
specify the location of the LoTW application TQSL on your PC's hard drive
Note that TQSL must be installed on a drive directly attached to your PC; otherwise, DXKeeper will be unable to obtain your station locations. To start TQSL, click the Run button. |
| station location * |
Select the
TQSL
Station Location to be associated with QSOs submitted to LoTW via
Note that you cannot add a new Station Location or modify an existing Station Location using this selector; you can only do that in TQSL. If you add, modify, or delete a Station Location in TQSL, click the Update button to update the Station Location selector. |
| station callsign * |
Specifies the Station Callsign to be associated with QSOs
submitted to LoTW via
If the currently-selected Station Location specifies a Station Callsign, it will appear in this setting. If the currently-selected Station Location does not specify a Station Callsign, [NONE] will appear in this setting, and you will be prompted to specify the Station Callsign to be used. |
Update LoTW Membership button
enabled if the LoTW database is present in DXView's Databases folder or in DXKeeper's Databases folder
if no Maximum age of most recent LoTW upload is specified, clicking this button sets LoTW Member item to 'Y' in all QSOs in the Log Page Display that has been confirmed via LoTW, or whose callsign is found in the LoTW database.
if a Maximum age of most recent LoTW upload is specified, clicking this button
sets the LoTW Member item to 'Y' in all QSOs in the Log Page Display that have been confirmed via LoTW, or whose callsign is found in the LoTW database with a "date of last upload" within the interval specified by Maximum age of most recent LoTW upload, or whose callsign is found in the LoTW database with a "date of last upload" after the QSO date
clears the LoTW Member item in all QSOs in the Log Page Display that have not been confirmed via LoTW and whose callsign is not found in the LoTW database with a "date of last upload" within the interval specified by Maximum age of most recent LoTW upload and whose callsign is not found in the LoTW database with a "date of last upload" after the QSO date
The Club Log panel on this tab provides settings that enable DXKeeper to upload QSOs to Club Log, delete QSOs from Club Log, download confirmations from Club Log, and download new OQRS requests from Club Log.
Note: The Password specified in this tab will appear in generated errorlog.txt files when Log debugging information is enabled; do not employ a username or password that you also use to secure valuable online accounts!
|
specifies the Email address with which you've registered with Club Log |
|||||||||
|
specifies the password that enables your access to Club Log; clicking the ? button reveals the password |
|||||||||
| Callsign | specifies the station callsign in your Club Log account to which QSOs should be uploaded and from which Inbound OQRS requests should be downloaded; this setting is stored with each log file, and thus changes when a new log file is loaded | ||||||||
| Auto upload * |
when checked, any QSO logged by DXKeeper either
directly, or on behalf of another application and whose station callsign
item matches the specified Club
Log Callsign, will automatically be
uploaded to
Club Log
using the above settings
|
||||||||
| Slow net | when checked, QSOs are uploaded in small chunks to ensure delivery when uploading via a slow internet connection | ||||||||
| Include seconds in uploaded QSOs * |
determines whether the QSO Start Time in QSOs uploaded to Club Log will specify time to the minute, or to the second
If all QSOs uploaded to Club Log come from DXKeeper, then this option can remain in its default 'not checked'; setting. However, if QSOs have been or will be uploaded to Club Log from other applications, then this option should be set to match the behavior of those applications to avoid creating duplicate QSOs in Club Log. If you change the setting of this option with QSOs already uploaded from the current log to Club Log, you should direct Club Log to clear all QSOs and then resubmit the QSOs from this Log. |
||||||||
| Inbound OQRS |
|
| QRZ Logbook Selection |
|
||||||||||
| Auto upload * |
when checked, any QSO logged by DXKeeper either
directly, or on behalf of another application whose station callsign
item matches the selected QRZ Logbook
Selector, will automatically be
uploaded to the selected QRZ Logbook
|
||||||||||
| Alert if QRZ reports QSOs not present in your log * | When checked, the Sync QRZ QSOs and Sync QRZ QSLs functions will alert you if QRZ reports QSOs not present in your log | ||||||||||
| Provide "Sync QRZ QSOs" function * | When checked, the Sync QRZ QSOs function is made available in the QRZ Operations panel on the Main window's QSL tab so you can accept QSOs in QRZ not present in your log |
| Don't save non-callsign QSL Via items to ADIF or tab-delimited files | if checked, the Save ADIF file and Save TDF file functions will ignore QSL Via items whose content is not a single callsign |
| Frequency precision |
specifies the number of decimal digits shown in transmit frequencies and receive frequencies included in ADIF and Tab-delimited files exported from the QSL Queue; the valid range is 3 to 6. |
Settings on this tab specify
the printer to be used for printing QSL cards and Reply cards
the printer to be used for printing QSL labels and address labels
the printer to be used for printing Envelopes
For each of these three printing categories, you can specify the paper size, paper source, and print quality.
If you have a single printer, configure all three printing categories to utilize that printer.
| QSL cards and Reply cards |
|
||||||||||
| QSL labels and address labels |
|
||||||||||
| Envelopes |
|
||||||||||
| Ignore printer-imposed margins |
when checked, top and left margins reported by the printer driver are ignored and reported as 0; this allows borderless printing of QSL cards and labels. Note that doing this could damage your printer, so USE AT YOUR OWN RISK. |