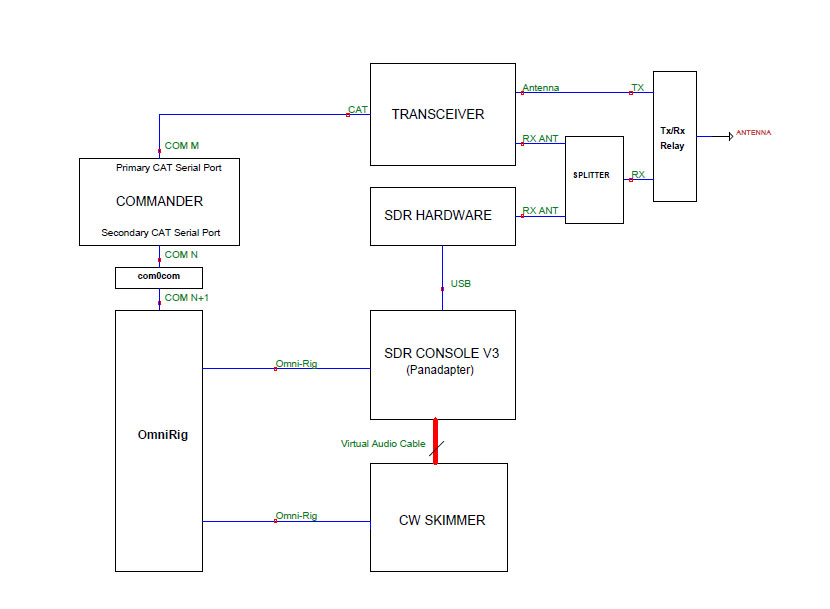
Configuring SDR Console and CW Skimmer with a Transceiver and SDR Hardware
de Joe W4TV
This configuration provides simultaneous panadapter and CW Skimmer functionality for SDR hardware that connects to the transceiver's antenna using SDR Console and free (donationware) Virtual Audio Cables . Configured in this way, CW Skimmer and SDR Console get frequency information from Commander's Secondary CAT Serial Port. SDR Console controls the SDR hardware, displays a panadapter and converts audio received from the hardware via ExtIO.dll to I/Q (IF) audio for CW Skimmer.

The SDR hardware (receiver) can be connected to the transceiver's main antenna using a T/R relay and splitter as shown, connected to the transceiver’s “receive antenna loop” with a splitter, or could possibly use a separate “receive only” antenna or connect to your transceiver's IF output.
- Start by configuring SDR Console to work with your SDR hardware.
Establish a connected pair of virtual serial ports using VSP Manager, com0com or other virtual “null modem”; these instructions assume that a connected pair of virtual ports N and N+1 have been created (e.g. 13 and 14)
Configure SDR Console to work with (track) an External Radio as documented here
Enable the external radio interface by selecting View -> More Options, checking External Radio and restarting SDR Console
Display the external radio options by clicking the ? button in the external radio main display.
- Make any transceiver specific settings that may be needed as documented in the SDR Console on-line help.
- Configure Omni-Rig
Click the ? button followed by the Omni-Rig button
Select the Radio 1 tab
Set Rig type to TS-2000
Set Port to COM N
Set Baud rate to 115200
Set Data bits to 8
Set Parity to None
Set Stop bits to 1
Set RTS and DTR to Low
Set Poll int, ms to 100. If communication between SDR Console and Commander becomes unreliable, increase the Poll int, ms to 500.
Click OK
Check all four of the Tracking boxes:
The Radio -> SDR boxes allow SDR Console to follow changes in frequency/mode from Commander or your transceiver's controls, and to follow double-clicks in SpotCollector.
The SDR -> Radio Frequency box causes Commander (and your transceiver) to change frequency by clicking in the SDR Console spectrum/waterfall display or in the Receive window.
The SDR -> Radio Mode box permits changing your transceiver's mode by clicking in SDR Console's Mode window.
Wide-L/Wide-U will not properly select your transceiver's Data-L/Data-U modes due to mode mapping limitations in both Omni-Rig and Commander's Secondary CAT Serial Port
- SDR Console does not provide RTTY or RTTY-R modes
Configure Commander's Secondary CAT Serial Port
In the Secondary CAT Serial Port panel on Commander's Configuration window's Ports tab,
Set the CAT protocol selector to Kenwood
- It is not necessary to use the same protocol as your transceiver
- Some protocols support DATA_U/DATA_L which has the potential to confuse SDR Console
Select Follow & Lead Primary
If you want Skimmer and the Panadapter to follow VFO B when in split, check theFollow & Lead Alternate VFO when Split box
If you are connected to the transceiver's IF Port, do not check the Follow and & Lead Alternate VFO when Split box
Set the Port# to N + 1
Set the Baud selector to 115200
Set the Word selector to 8
Set the Parity selector to None
Set the Stop selector to 1
Set DTR to Off
Set RTS to Off
Check the Enable box
At this point, you can Start the SDR in SDR Console, start the External Radio and click Track to begin using SDR Console as a panadapter slaved to your transceiver.
To connect/configure CW Skimmer to work with/from the SDR.
- Install a Virtual Audio Cable application to convey audio from SDR Console to CW Skimmer; some options include:
Enable CW Skimmer support in SDR Console as documented here
Enable CW Skimmer support by selecting View -> More Options, checking the CW Skimmer box, and restarting SDR Console
Press the CW Skimmer button to display the options
Check the Enable box
DO NOT check the Serial port box; CW Skimmer will communicate with SDR Console (and Commander) using the same copy of Omni-Rig as SDR Console uses to communicate with Commander.
Set the Bandwidth to 48 KHz
Set the Output Device to the input of your Virtual Audio Cables
- Configure CW Skimmer
- Start CW Skimmer
Click on the Settings icon (or View -> Settings)
Select the Radio tab
Set Hardware Type to SoftRock-IF
Set Sampling Rate to 48 KHz
Set CW pitch, Hz to your sidetone frequency
Select the Audio tab
Set Signal I/O Device to your Virtual Audio Cable
In the Channels box, select Left/Right = I/Q
Select the CAT tab and check the Use Radio 1 box
Select the Commands Menu and confirm that there is no check mark to the left of the Blind Mode entry.
Interoperating with Software-defined Radios, Consoles, and Panadaptors
Interoperating with a Software Defined Radio Console using connected virtual serial ports
