Controlling Multiple Radios
Commander can be configured to rapidly switch among four simultaneously-connected primary radios, either by clicking selection buttons that appear in the Main window's VFO panel, or automatically based on frequency. Via its Secondary CAT Port, Commander can independently interact with a secondary radio, causing this secondary radio's frequency and mode to follow the currently-selected primary radio's frequency and mode, or causing the currently-selected primary radio's frequency and mode to follow the secondary radio's frequency and mode. You can configure DXKeeper to automatically record information about the primary transceiver used in each QSO.
Commander's Secondary CAT Port can alternatively be used to convey the primary transceiver's frequency to an external device, like an amplifier, tuner, or antenna switch.
WinWarbler's MultiRadio window enables you to independently specify the following information for each radio:
- PTT settings
- Soundcard settings
- Startup Macros
- PSK Settings
- RTTY Settings
- CW Settings
- Phone Settings
With the Enabled box checked on this window's General tab, selecting a new primary radio in Commander will automatically activate the new settings in WinWarbler.
Setting up a Primary Radio
On the Configuration window's Multi-Radio tab,
in the Control panel,
select Radio #1's Model; if this radio is an Icom, specify Radio #1's CI-V Address
check Radio #1's Interrogate box
specify Radio #1's Name; the name you specify will appear besides this radio's selection box on the Main window, so choose something easily recognizable (e.g. IC-7200 or TS-2000 or FT-5000)
in the CAT Serial Port panel,
select Radio #1's Serial Port #, the COM port to which this radio is attached; if this radio doesn't use a COM port, select the - (hyphen) at the end of the list of COM ports.
select Radio #1's Baud rate
select Radio #1's Word length
select Radio #1's Parity
select Radio #1's Stop bits
select Radio #1's DTR (if this modem control signal will be used as a power supply for an external interface, then set it to Y, otherwise set it to N)
select Radio #1's RTS (if this radio is a Kenwood, or if this modem control signal will be used as a power supply for an external interface, then set it to Y, otherwise set it to N)
in the Control panel, check Radio #1's Enable box (if the Enable box is grayed out, then one or more of Radio #1's settings in the Control or CAT Serial port panels have not been specified
- repeat steps 1, 2, and 3 above for each additional radio, configuring the settings for Radio #2, Radio #3, and Radio #4.
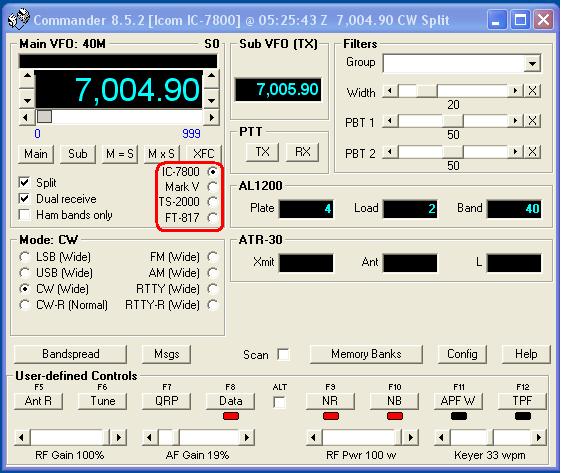
After the above steps have been completed, you can select a primary transceiver by clicking the appropriate selection button on Commander's Main window; these selection buttons are highlighted in this screen shot:

You can configure Commander to automatically place the appropriate User-defined Command Sequences and Sliders in the Main window's User-defined Controls panel whenever a new primary radio is selected.
Configuring Automatic Primary Radio Selection Based On Frequency
In the Configuration window's Multi-Radio tab's Selection by band panel
configure each band's radio selector
check the Auto box
Configured in this way, a change of frequency from one band to another will cause Commander to automatically select the radio specified in the new band's radio selector
Configuring WinWarbler to Change PTT, Soundcard, CW, PSK, Phone, RTTY, and Startup Macro settings when a Primary Transceiver is Selected
See Switching Among Multiple Radios in WinWarbler
Setting up a Secondary Radio
In the Secondary CAT Serial Port panel on the Config window's Ports tab,
set the CAT protocol selector to specify the protocol used by the secondary radio
if you set the CAT protocol selector to Icom, a CI-V Addr box will appear to its left; type your secondary Icom radio's CI-V address (in hexadecimal) into this box
if the CAT protocol you select requires Commander to periodically interrogate your secondary radio to track its frequency and mode, an Interrogate selector will appear to its left; set this selector to 200 ms
set the Port# selector to the COM port to which the secondary radio is attached
set the Baud selector to the secondary radio's baud rate
set the Word selector to the secondary radio's word length (usually 8)
set the Parity selector to to the secondary radio's parity (usually None)
set the Stop selector to to the secondary radio's stop bits (2 for Yaesu radios, 1 for most others)
set the DTR selector to On if the secondary port's DTR modem control signal serves as a power supply for an external interface; otherwise set the DTR selector to Off
set the RTS selector to On if the secondary radio is a Kenwood or if the secondary port's RTS modem control signal serves as a power supply for an external interface; otherwise set the RTS selector to Off
- specify the relationship between the primary and secondary radios
if you want the secondary radio's frequency and mode to track the primary radio's frequency and mode, click the Follow Primary button
if you want the primary radio's frequency and mode to track the secondary radio's frequency and mode, click the Lead Primary button
if you want a change in frequency or mode of either the primary or secondary transceiver to be reflected in its counterpart, click the Follow and Lead Primary button
check the Enable box
To force Commander to ignore the secondary radio, uncheck the Secondary CAT Serial Port panel's Enable box
Commander's Secondary CAT Port can also be used to enable interoperation with Software-defined Radio Consoles and with CW Skimmer:
Interoperating with a Software-defined Radio Console using connected virtual serial ports
Interoperating with a Software-defined Radio Console using a microHAM interface with CAT control
Configuring the SpectraVue Software-defined Radio Console with an SDR-IQ or SDR-14
Configuring the BobCAT Software-defined Radio Console for use with a Perseus
Enabling CW Skimmer to track and set your transceiver's frequency
Additional Topics
